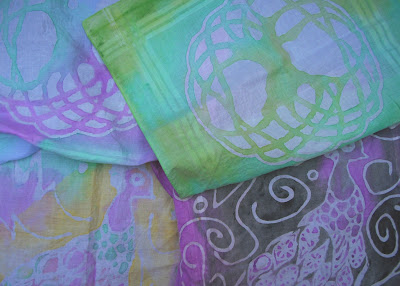
The thing is, both her kids and mine did fairly simple designs.
I appreciate simplicity. Really, I do. But I also happen to be a glutton for punishment, so I decided to go with some more complex designs for my own, uh, kicks and giggles. That, and I needed an example as well as an idea of how the teach it.
So here's the break down on how to do glue batik (non-toxic/non-flammable):
I decided to try the tree of life first, so I sketched the outlines on a large piece of paper and then went over it with black marker. This was a case of it looking easier than it was...
I purchased a pack of 6 handkerchiefs from Target for about $5ish. One of those ended up taped down on top of my sketch. I happen to have a large drafting clipboard to work on, but wherever you end up, make sure there's plenty of space and time- you'll need to leave it alone for a while.
One of the things emphasized in the original tutorial is that this needs to be done with gel glue- NOT white glue. I didn't catch that until after I had tried another design (which I'll compare to gel glue down below). Now, this is back-to-school season, so getting glue isn't a problem. If you're looking for white glue. Gel glue, on the other hand, it a totally different story. Between Target and Wal-mart the only thing I could find with a gel base was glitter glue. So, there it is. My glitter glue tree of life.
This can be painted in with a brush, but I used it straight from the bottle. Remember that any areas covered with glue stay white, so plan accordingly. I wanted the tree colorful, so glue went to the negative space. And by the way, when you later peel it up to prep for paint, paper will stick. Not a problem. It will come off in the rinse and won't affect the design.
Leave the glue alone for a while. I needs to set so it's not too tacky (as I'm convinced glitter glue never actually dries). When you're ready to go on, mix acrylic paints with water. There's no science to this, but I ended up with a squirt of color and about 1/2 of a cup water. Using a brush, I dabbed and painted the colors. Remember, the if you paint near another wet color, they'll bleed together.
Luckily, I like that look.
After the paint was completely dry, I threw the handkerchief in a bucket of water and forgot it for a little while. About an hour later, the glue was loose enough for me to scrub it off by rubbing the fabric against itself. If you try doing this with glitter glue, I can say with certainty that it needs to be cleaned under running water, because that glitter is stubborn as hell. There may be a few flecks of glitter left on these, but the most important thing it to get the glue out.
And there you have it.
Here's the comparison of a design done with white glue and one with gel. Both handkerchiefs feature the same peacock design, but the one on the left was done with white glue. It ran together and diminished the design I had created. While it was easier to clean up than glitter, it didn't look as clean.
Note to self: work on those photography skills. Yikes.
Music to craft to- Minus The Bear – OMNI


No comments:
Post a Comment