Sunday, December 16, 2012

Sew Crafty: Holiday Bunting

A few months ago I came across this bunting tutorial on Youtube:

And decided that this month was the perfect time to try it myself.
I found some sample sizes of 4 different wintery materials and decided to use a bone colored fabric for the back and a natural ribbon instead of the white tape suggested by Hannah.


I may have taken me over a week to do this, but I had problems sitting at my sewing machine for more than 30 minutes at a time. It's a fairly easy craft, but somewhat time consuming. At least, for me.

Happy Holidays!

Music to craft to: My Christmas Favorites

Wednesday, December 5, 2012

Random Recipe: Semi-homemade Soup

It's the time of year when everyone shows up to work with the sniffles. Kids come to class to share their colds. We all need relief.
And chicken noodle soup is here to help. This is a recipe I got from my grandma, who got it from someone else in the grand tradition of recipe sharing. So, now I share it with you. It's a chicken noodle soup that is, for the most part, made entirely by you. There's just a little help from Mrs. Grass.

Grandma's Chicken Noodle Soup
1 package Mrs. Grass homestyle chicken noodle soup mix
1 chicken, whole
5 cups water
1 cup white wine
8 oz. Velveeta
curry powder, to taste

Skin and trim the fat on the chicken. Tuck the wings under and place breast down in a large pot. Pour in the soup mix, water, and wine. Bring to a boil then let simmer for an hour or until the chicken is thoroughly cooked.
Remove chicken and cut meat into small pieces. Put chicken, Velveeta, and curry powder in the broth and stir.

That's all!

This is great to make for a big group of friends or a good week's worth of lunches! And remember- don't be as impatient as I tend to be. Let the chicken cool before carving it up.


Thursday, November 15, 2012

A Warm Welcome- Salt Dough Tiles

After finally taking down my Halloween wreath, my bare door screamed for adornment. I decided to forgo another wreath until December so after pulling out the salt and AP flour, I made tiles out of salt dough.

I used the recipe from Allrecipes.com:
4 cups AP flour
1 cup Salt
1.5 cups warm water


  1. Preheat oven to 325 degrees F (165 degrees C).
  2. Mix flour and salt well. Gradually add water, stirring with a large spoon. Finish mixing with hands. Knead until soft and pliable.
  3. Roll out on floured surface about 1/8 inch thick. Cut shapes with cookie cutters. Place on cookie sheets.
And that was where I stopped following directions. Instead of poking holes, I stuck paperclips into opposing sides. The instructions say to make these around an hour, but I started them at 200 degrees for an hour and then bumped up the heat to keep them from getting too puffy. Overall, I ended up baking them around 2 hours. Suffice it to say, one side of the tiles got a bit brown, but I actually love that look. That's why I chose the brown side for the lettering (that's not brown paint!). Letters where hand written with pencil and painted over with acrylic. Tiles were attached with small loops of twine and red ribbon is at the top.
You may be looking at this lovely decor and thinking "That's awfully long. It has to swing all over the place." You'd be right. For the first half hour, it did. After that I grabbed 2 small picture nails and tacked them above the C and last E and now the swinging and non-existent.

Music to craft to- Tristan Prettyman radio

Tuesday, October 23, 2012

My sincerest...

Apology. I'm sorry for the lack of anything here. My laptop has decided it doesn't need to utilize its screen to function, which has left me in an unappreciative and laptop-less position. I'm currently using the work computer, which means I don't have the files I need (currently on my personal computer). So, please accept this instragram-ed picture of the jack-o-lantern I carved this past Saturday.


No Spotify playlist this week... but how about the Sleepy Hallow Soundtrack for "Music to Craft to"?

Saturday, October 6, 2012

Thrifty Halloween: Black and Orange Wreath

With the majority of my Autumn and Halloween decorations in storage at my parents' house right now, I decided I needed a way to start decorating- on the cheap. I found a plastic black and orange striped table cloth at Target for $3 (and ultimately used one and 1/5ish) and an old wire hanger in the deepest depths of my closet. After a few hours of tying strips to the now circular hanger, I had the wreath. Then, after a few days of looking at the plain wreath, I decided to add a jack-o-lantern, which I made with a scrap of orange craft foam and Martha Stewart glitter in the color "Fire Opal".

Happy Hallowen!

Music to craft to- Spooky

Saturday, September 15, 2012

From the Vault: Tissue Paper Stained Glass

A few years ago I decided to make my own window treatments. I lieu of the usual curtains or blinds, I utilized a technique I worked on for a sculpture a few years prior- a stained glass effect made by layering different colors of tissue paper. To be honest, it took a while. But, unlike now, I had the NHL to keep me entertained while I was working.

When I was working on this I had no intentions of ever posting it to a blog so there are no pictures of early steps. But, trust me, there's some prep work that should not be skipped. Make sure the window are measured and that your sketches are the right proportion. I happened to have large rolls of thick paper, so I used those to created a full scale drawing that would help me keep pieces organized and provide something for me to trace if I had a tricky shape to do. When it was all over, I had these:
Taken from outside

Not too shabby, right? Here's the nitty gritty on how to do it.
You'll need: several sheets of tissue paper in the color families you intend to use
Mod Podge ( I went through about 3 or 4 large jars)
Parchment paper
Scissors
Black electrical tape
**I worked on cookie sheets so I could move them to different locations for working or drying**

For the color sheets, tear tissue paper into smaller square-ish shapes, a few inches in size, and tack them to the parchment paper with the Mod Podge. After a layer of color I coated the whole thing with Mod Podge and then added another layer. I didn't stick with a single shade- when I made green "stained glass" I used every shade of green that came in the pack. I was also fairly haphazard with the layering so that I wouldn't end up a grid look. After I finished around 4 layers of tissue paper, generously coated with Mod Podge, I set the cookie sheet aside for a few hours of drying. Once dry, it's fairly easy to peel the color sheet off the parchment, though a few rogue squares may need to be reattached.

Using the full scale drawing as a guide, I cut the various colors into the correct shapes and then set them on the drawing... mostly so I could see what the picture was looking like as I made progress. The "lead" in the project is black electrical tape. Easy to find and fairly cheap, it also happens to be pretty flexible, so I could use it in curves without much hassle. It's important to remember, though, to do both sides of the design with tape. This is what it all looked like complete-


DSCF2066 DSCF2063 DSCF2067
(I attached these to my windows with magnets because the muntins are made of metal)

Music to craft to- Of Monsters And Men – My Head Is An Animal

Thursday, August 30, 2012

Pirate Apparel: Flag Stenciled T-shirts

Earlier this August, my family came together to mourn/celebrate Black Tot Day. If you're in the same position I was a year ago, you have no idea what this is. No worry. This will all be explained. A little back story first- last summer my family, as well as my uncle and his family, spent a week in Bermuda. Under the influence of island history (a la the Royal Navy Dockyard) and many a Dark and Stormy it was decided that in 2012 we would have a party for Black Tot Day. Essentially, after centuries of various forms of alcoholic rations, it was decided that July 31, 1970 would be that last day that the Royal Navy would issue rum rations. To mourn this event, sailors wore black arm bands, buried tots (small amounts of liquor) at sea, and held mock funerals. It became our duty to continue this tradition, but with a stronger emphasis on the party aspect.

As for what we were all to wear- that was much broader than traditional Royal Navy sailor garb. Pirates and beach bums were welcome as well. So, I decided to make t-shirts for my sister and me featuring famous pirate flags. Sister got the Jolly Roger and I sported Blackbeard's flag. In order to make these, I created stencils from printer paper. I have to ability to create silk screens and multi-use stencils, but because I intended to use each design only once, I went with the disposable paper stencil. But first, I had to sketch them out.
Menacing, aren't they?
The Jolly Roger was easy enough, but Blackbeard's design gave me some trouble. The big thing to remember here is to save those little bits (the negative space, as it is) from inside the design. To affix the stencil to the shirt I used CCI Mist Adhesive, which I highly recommend. I've used this for years in my silk screening and it's fantastic: it's no drip and strong enough to stick to your projects but doesn't leave any residue.

 I actually save everything I cut out so I can make sure those bone highlights, nose, and eyes make it to the right place.

This design is solely bone, so I used a 50/50 mixture of Tulip's soft fabric paints (matte) in the colors Linen and Glacier White. The Blackbeard design had the same off white mixture  along with Crimson Red mixed with a touch of Ebony, both Tulip paints with a matte finish.


The Pirate Sisters
 To Queen Elizabeth II, a willing soul, and a sea room!

Monday, August 27, 2012

Beachcomber Craft: The Driftwood Wreath

A little while ago I was at a cousin's cottage on the Potomac River. After the crabs were devoured my mom found a small wreath made with driftwood- a gift from the the neighbor- and decided, without hesitation, that we needed to make our own.

The Potomac doesn't quite offer the variety that an ocean beach does, but we made off with a pretty good collection of driftwood, sea glass and brick, shells, shark teeth, and fossils I've always called "curlicues" because I have no idea what they actually are. They're pictured in the second detail shot, so if you know, send the information my way! Luckily, we ran into the artist who inspired us, and she helped us beach comb, gave us a few tips, and even showed us her own collection.

Everything I wanted on my wreath was assembled and attached to a wooden wreath form. The driftwood could be glued down with hot glue (and a few twists of thin wire for the less stable pieces) but the other items required floral glue. You may be surprised by this, because I certainly was, but when I tried using super glue, the shell and wood started smoking. So... I stuck with the floral glue.


 Music to craft to- Surf Playlist

Wednesday, August 15, 2012

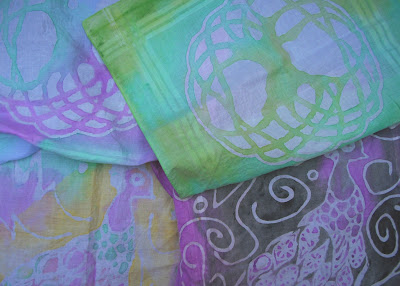
Let's get her started... Easy Batik

A few weeks ago I worked a mixed media Summer camp for kids between the ages of 7 and... a freshman in high school. That's an amazing age gap so finding art activities for them to do during the week without it being too difficult or too easy was a slight challenge. Luckily, I stumbled across this glue batik tutorial. The crafty lady did this activity with her kids and it ended up being a success with my campers, too.
The thing is, both her kids and mine did fairly simple designs.
I appreciate simplicity. Really, I do. But I also happen to be a glutton for punishment, so I decided to go with some more complex designs for my own, uh, kicks and giggles. That, and I needed an example as well as an idea of how the teach it.

So here's the break down on how to do glue batik (non-toxic/non-flammable):
I decided to try the tree of life first, so I sketched the outlines on a large piece of paper and then went over it with black marker. This was a case of it looking easier than it was...
 I purchased a pack of 6 handkerchiefs from Target for about $5ish. One of those ended up taped down on top of my sketch. I happen to have a large drafting clipboard to work on, but wherever you end up, make sure there's plenty of space and time- you'll need to leave it alone for a while.

One of the things emphasized in the original tutorial is that this needs to be done with gel glue- NOT white glue. I didn't catch that until after I had tried another design (which I'll compare to gel glue down below). Now, this is back-to-school season, so getting glue isn't a problem. If you're looking for white glue. Gel glue, on the other hand, it a totally different story. Between Target and Wal-mart the only thing I could find with a gel base was glitter glue. So, there it is. My glitter glue tree of life.
 This can be painted in with a brush, but I used it straight from the bottle. Remember that any areas covered with glue stay white, so plan accordingly. I wanted the tree colorful, so glue went to the negative space. And by the way, when you later peel it up to prep for paint, paper will stick. Not a problem. It will come off in the rinse and won't affect the design.

Leave the glue alone for a while. I needs to set so it's not too tacky (as I'm convinced glitter glue never actually dries). When you're ready to go on, mix acrylic paints with water. There's no science to this, but I ended up with a squirt of color and about 1/2 of a cup water. Using a brush, I dabbed and painted the colors. Remember, the if you paint near another wet color, they'll bleed together.

Luckily, I like that look.
 After the paint was completely dry, I threw the handkerchief in a bucket of water and forgot it for a little while. About an hour later, the glue was loose enough for me to scrub it off by rubbing the fabric against itself. If you try doing this with glitter glue, I can say with certainty that it needs to be cleaned under running water, because that glitter is stubborn as hell. There may be a few flecks of glitter left on these, but the most important thing it to get the glue out.
 And there you have it.
 Here's the comparison of a design done with white glue and one with gel. Both handkerchiefs feature the same peacock design, but the one on the left was done with white glue. It ran together and diminished the design I had created. While it was easier to clean up than glitter, it didn't look as clean.
This was a nice, easy alternative the the traditional melted wax technique used for Batik and great for kids to do. I may try this again in the future for pillows and try dye instead of watered down acrylic.

Note to self: work on those photography skills. Yikes.

Music to craft to-  Minus The Bear – OMNI

Friday, July 27, 2012

Hello, friend!

Welcome to my craft blog. It's a work in progress right now, as I've got a few projects going on but none of them done yet. Check back soon, though!